Rules
To open the list of rules, go to Mail -> Rules -> Rules. You can add new rules, edit or delete the existing once, etc.
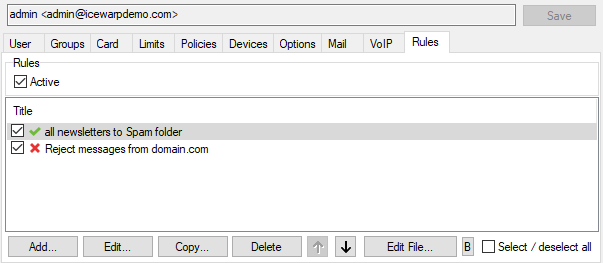
Figure. User level management: Rules tab.
Note: Rules can be activated and de-activated by checking /un-checking the box to the left of the rule. This is useful for testing purposes or to disable a rule for a time without deleting it.
Rule dialog
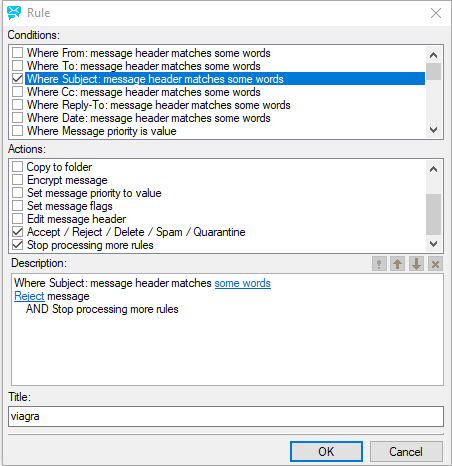
Figure. Rules tab: Rule dialog
Rules Conditions
|
Field |
Description |
|---|---|
|
Where From: message header matches some words |
Checks the From: header for a string. In the rule description, click the some words to create the string (explained below). |
|
Where To: message header matches some words |
Checks the To: header for a string. In the rule description click the some words to create the string (explained below). |
|
Where Subject: message header matches some words |
Checks the Subject: header for a string. In the rule description click the some words to create the string (explained below). |
|
Where Cc: message header matches some words |
Checks the Cc: header for a string. In the rule description click the some words to create the string (explained below) |
|
Where Reply-To: message header matches some words |
Checks the Reply-To: header for a string. In the rule description click the some words to create the string (explained below). |
|
Where Date: message header matches some words |
Checks the Date: header for a string. In the rule description click the some words to create the string (explained below) |
|
Where Message priority is value |
Checks the priority of a message. Click Normal in the rule description to select a priority. |
|
Where Message is spam |
Checks whether the message has been marked as spam. |
|
Where Message is size |
Checks the message size. Click the 0 kB to select the message size criteria. Select Greater or Lower and specify a size (in kB, MB or GB) |
|
Where Message body matches some words |
Checks the message body for a string. In the rule description click the some words to create the string (explained below). Note: Use this option with care as scanning the whole message body of every incoming message could seriously affect your server performance. |
|
Where Custom message header matches some words |
Checks a custom message header for a string. In the rule description click the some words to create the string (explained below). Note: This rule has an unusual format for the string condition! format – <header>:<string condition> where <header> is the name of your custom header <string condition> is the string to test the header for. Example: MyHeader:jim;bob;john Would check the MyHeader header for any of the strings "jim", "bob" or "john". |
|
Where Any message header matches some words |
Checks all headers for a string. In the rule description click the some words to create the string (explained below). |
|
Where Attachment name matches some words |
Checks the attachment name for a string. In the rule description click the some words to create the string (explained below). |
|
Where message contains attachment |
Checks whether the message has an attachment. |
|
Where Sender matches some words |
Checks the sender for a string condition. In the rule description click the some words to create the string (explained below) |
|
Where Recipient matches some words |
Checks the recipient for a string. In the rule description click the some words to create the string (explained below). |
|
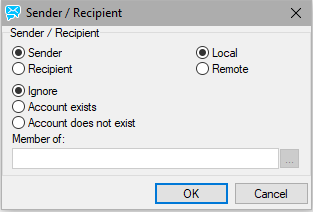
Where sender/recipient is local/remote |
Checks the location of the sender or recipient. In the rule description click the local/remote to open the following dialog:
Note: Only available for local accounts.
Note: Only available for local accounts that you check the existence or non-existence of. |
|
Where Sender's IP address matches some words |
Checks the remote IP address for a string. In the rule description click the some words to create the string (explained below). |
|
Where rDNS (PTR) matches some words |
Checks the rDNS (PTR) record for a string. In the rule description click the some words to create the string (explained below). |
|
Where Sender's IP address is trusted |
Checks whether the sender's IP address is in the trusted list. |
|
Where Spam score is value |
Click the 0.0 in the rule description to define a greater than or less than value to check the spam score against. |
|
Where SMTP AUTH |
Checks whether the message was delivered using an SMTP authorized connection. |
|
All messages |
A special condition that evaluates TRUE for all messages – use with care! |
|
Contains value from a list (semicolon separated) |
Populate the String box with a list of strings to test for. |
|
Matches (RegEx) |
Populate the String box with a regular expression. For more information, refer to the Simple RegEx Tutorial. |
|
Starts with |
Looks for the string specified in the String box at the beginning of the tested text. |
|
Ends with |
Looks for the string specified in the String box at the end of the tested condition. |
|
Equals |
Tests whether the tested text is exactly equal to the string specified in the String box. |
|
Contains a value from a file or pattern |
Into the String box, enter the path to a text file containing a list of strings you wish to test for. Click the "..." button to open the Open dialog to navigate to a file where the strings are specified, one per line. |
|
Match case |
Check the box if you want the comparison to be case sensitive, i.e. "Viagra" will match "Viagra" but not "viagra". |
|
Match whole word only |
Check the box if you want the comparison to be true only if the string is not part of another word, i.e.: "Viagra" will match "Viagra works" but will not match "Viagraworks". |
String Condition Dialog
When you see some words in a rule Description, click it to open the String Condition dialog and define the words you need to filter.
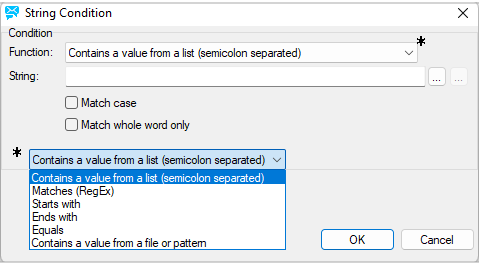
Figure. String condition dialog.
Rules actions
The following actions can betriggers when a condition is fulfilled. You can select multiple actions by checking multiple boxes. Selected action will be added to the Description box. For some actions you can click the text in the description to define the action further.
|
Field |
Description |
|---|---|
|
Send message |
Check to send a message. The message link is added into the Description area. Click this link to open the Message dialog, where you can specify the From address, To address, Subject and message Text. |
|
Forward to email address |
Check to forward the message to an email address. Click the email address in the Description box to specify the email address. Note: You can also send an instant message or an sms using this option: |
|
Copy to email address |
Check to have a copy of the message sent to another email address. The text email address is added to the rule description. Click on this to open the Email Address dialog, allowing you to specify the address(es) to send a message copy to. Multiple accounts can be specified, separated by semicolons. Use the '...' button to select accounts. Note: There is a difference between the Copy ... and Forward ... options: The forward action forwards the messages as-is without any changes done by the content filter. Provided that the Use MDA queue for internal message delivery option (Mail - General - Advanced) is enabled, the copy action sends the message after all changes by the content filter have been applied. Lets say the content filter contains an action to change the message's header. The forward will send the message without changes and the copy will send the changed header message. |
|
Move to folder |
Moves the message to a folder. Click the folder in the Description area to select the folder to move to. Note: The folder tree does not fill when you access this action within Content Filters, you have to manually specify a mailbox. Example: A message sent to john:%%important%%@icewarpdemo.com will be stored in the folder of important. Note the colon used to separate the user's alias from the folder name – this can be changed to another character using the API. |
|
Copy to folder |
Copies the message to a folder. Click the folder in the Description area to select the folder to copy to. For description of the selection dialog, refer to Filter Actions. Note: Although the INBOX folder may be shown in the folder tree, there is little point selecting this folder as this is the default folder that messages will come in to. |
|
Encrypt message |
Check to have the message encrypted. Note: For this option to work there must be a copy of the user's public certificate located in a file called cert.pem in the user's mailbox folder. The message will be encrypted using this certificate and then can only be decrypted by the user using his/her private key in his/her email client. |
|
Set message priority to value |
Select to have the priority of the message changed. Click the Normal to select the new priority to be assigned. |
|
Set message flags |
Select to set a message flag. Click the flags to set the flag(s) you wish. |
|
Edit message header |
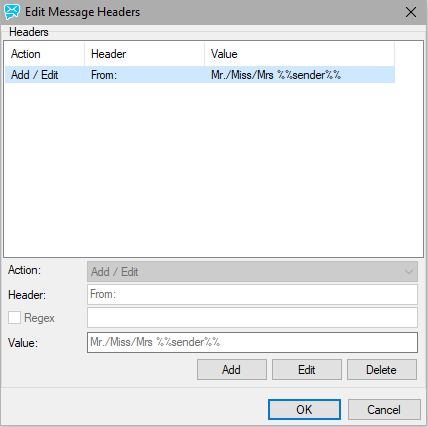
Select to Add, Edit or Delete a message header. Click the header to open the Edit Message Headers dialog.
Click the Add button to add a new rule. Select an already defined rule and click Edit or Delete to modify or remove a rule. In the Action dropdown, select whether this rule will add / edit a header or delete it. In the Header field, specify the header you want to change / add. Note: Remember that the last header name character has to be a colon. You can also add your own named headers e. g.: MyHeader: The first rule shown in the screenshot above modifies the From: header – it adds the string of "Mr./Miss/Mrs." to the beginning of the header. Note the use of the IceWarp Server system variable %%sender%% here, which is the value of the original From: header. It is possible to use any system variable. |
|
Accept/Reject/Delete/ Spam/Quarantine |
Check to add the Reject message (by default). Click Reject in Description to select Reject, Accept, Delete, Spam or Quarantine. |
|
Stop processing more rules |
Check to stop processing other rules in the list if the rule condition is evaluated as TRUE. |
